
Run Oracle 23c On-Premises NOW
Earlier this year, Oracle announced the release of Oracle Database 23c Free. This free edition of the database software replaces the old Express Edition and allows developers to start exploring the many innovations and improvements introduced in 23c. Last month, Oracle announced the general availability of Oracle 23c production within Oracle Cloud Infrastructure's Base Database Service. We can expect a downloadable version to appear for Linux x86 soon, with other platforms to follow.
But... what if you don't want to wait? What if you want to start experimenting with a production version of the database now without relying on Oracle's Base Database Service? For example, running the fully-featured software in a Docker or Podman container on your laptop.
WARNING: Proceed with caution. This is for education only, and it's unlikely the following steps are supported by Oracle. People who create an on-prem EE instance of DB 23c this way may be violating Oracle's license agreement because the OCI BaseDB instance has RUs/patches applied regularly. While on-premises, RUs/patches are only available to customers who have paid for Oracle Support.
To do this, we'll take advantage of the Oracle Installer's "Create Gold Image" capability to generate a copy of the 23c Oracle Home on the Base Database Service, transfer the resulting file to a local system, and use it as the installation media for a runInstaller operation.
Step 1: Create a 23c Database in OCI
From the Oracle Cloud Infrastructure (OCI) menu, navigate to Databases -> Oracle Base Database Service, then click on the "Create DB System" button to open the DB system creation wizard. Select a compartment, (optionally) give it a meaningful name, and select the Availability Domain to host the service.
Next, select the shape of the host VM system. I lowered the OCPU count to one for cost savings—there's no need for power or performance since we're only utilizing this to access the software!
If all you want is the database software, select Logical Volume Manager for storage management. This avoids the overhead of running Grid Infrastructure. (This same method works from a Grid Infrastructure home, too, so if you want the 23c GI software, go with Grid Infrastructure storage.) Shrink the data and Recovery Area storage values to the minimum—256GB.

The cost of running the database service is about $10 a day.
Set the node count, a software edition, add or generate the SSH keys you'll use to connect to the database host, and select a licensing option. In the networking section, choose an existing VCN and subnet and set or enable any additional options you'd like to use.

The final configuration of the minimal database service.
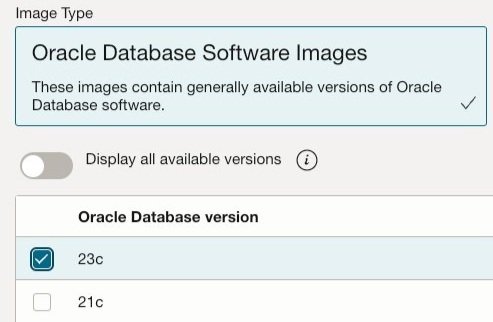
Click "Next" to enter the database details, including the database and PDB name, and select the Oracle Database 23c image by clicking on the "Change database image" option. You'll supply administrator credentials and set up backups on the remainder of the page. (Since I was using this simply as an avenue to generate the software, I deselected backups and didn't select any additional options.)
Now, click on the "Create DB system" button and wait. It took about 30 minutes to create my system, and costs about $10 a day to operate this configuration.
Step 2: Create a Gold Image of the Oracle Home
Once it's provisioned, navigate to the DB System page and select the newly created database. Look near the bottom left for the "Resources" section and click on "Nodes" for the IP address of the VM host. Use your SSH key to connect as the opc user:
ssh -l opc -i <path to private SSH key> <Node IP address>
Then, sudo to the oracle user and check the environment:
ORACLE_HOME=/u01/app/oracle/product/23.0.0/dbhome_1
ORACLE_SID=ORCLCDB
ORACLE_UNQNAME=ORCLCDB_cwf_sjc
The oracle user's home directory won't have enough space for the gold image, so create a destination directory on the system. I placed mine under /u02/app/oracle/gold:
mkdir -p /u02/app/oracle/gold
Now, call runInstaller from the ORACLE_HOME, passing the -silent, -createGoldImage, and -destinationLocation flags:
./runInstaller -silent -createGoldImage -destinationLocation /u02/app/oracle/gold
Launching Oracle Database Setup Wizard...

Successfully Setup Software.

Gold Image location: /u02/app/oracle/gold/db_home_2023-10-24_09-12-52PM.zip
For those wondering why I didn't use the clone.pl script:
It's deprecated;
It requires manual cleanup of configuration files;
It doesn't automatically tar/zip the archive.
Step 3: Transfer the Gold Image
For this, I used scp and renamed the file to match conventions used by earlier database releases:
scp -i <path to private SSH key> \
    opc@<Node IP address>:<zip file location>/<filename>.zip \
    <local directory>/LINUX.X64_233000_db_home.zip
Step 4: Installation
The file generated by runInstaller contains all patches present in the original Oracle Home but otherwise installs identically to recent database software. unzip the file to the desired home directory and call runInstaller. Assuming you're running this on a new system:
# Set and create the ORACLE_HOME
export ORACLE_HOME=/u01/app/oracle/product/23.3.0/dbhome_1
mkdir -p $ORACLE_HOME

# cd to the directory containing the gold image and unzip the file to the home:
unzip -oq -d $ORACLE_HOME LINUX.X64_233000_db_home.zip

# Perform a silent installation:
$ORACLE_HOME/runInstaller -silent -force -waitforcompletion -responsefile <path and name for response file>
Step 5 (Optional): Build an Image and Run a Container
To build a container image for a 23c database
Pull my Cloud Native Oracle repository.
Place the gold image zip file under the
databasesubdirectory.Update the name and md5sum in
config/manifestto match what's on your system.If not downloaded, comment out the line for patch 35921148, too.
hen build the image, which should take from five to ten minutes:
./buildDBImage.sh -v 23.3 -e EE
Once built, run an Oracle 23c Database container.
# Set the container name:
CONTAINER_NAME=ORCL233

# Set a directory to persist data, diagnostic and audit files:
ORADATA=/oradata

# Create the directories and assign them to volumes:
 for dir in audit data diag
  do mkdir -p $ORADATA/$
     docker volume create --opt type=none --opt o=bind \
            --opt device=$ORADATA/$ \
            $
done

# Run a container:
docker run -d \
       --name $ \
       --volume $_data:/opt/oracle/oradata \
       --volume $_diag:/u01/app/oracle/diag \
       --volume $_audit:/u01/app/oracle/admin \
       -e ORACLE_SID=ORCL \
       -e ORACLE_PDB=ORCLPDB1 \
       oracle/db:23.3-EE

# Monitor the progress of DBCA:
docker logs -f $CONTAINER_NAME
NOTE: Change docker to podman as necessary.
The log will show Listener startup followed by output from the Database Configuration Assistant (DBCA):
# docker logs -f $CONTAINER_NAME
# ----------------------------------------------------------------------------------------------- #
  runDBCA: Running DBCA for database ORCL at 2023-10-27 14:35:15
# ----------------------------------------------------------------------------------------------- #
LSNRCTL for Linux: Version 23.0.0.0.0 - Production on 27-OCT-2023 14:35:15
Copyright (c) 1991, 2023, Oracle.  All rights reserved.
Starting /u01/app/oracle/product/23.3/dbhome_1/bin/tnslsnr: please wait...
TNSLSNR for Linux: Version 23.0.0.0.0 - Production
System parameter file is /u01/app/oracle/product/23.3/dbhome_1/network/admin/listener.ora
Log messages written to /u01/app/oracle/diag/tnslsnr/5c440ea826ca/listener/alert/log.xml
Listening on: (DESCRIPTION=(ADDRESS=(PROTOCOL=ipc)(KEY=EXTPROC1)))
Listening on: (DESCRIPTION=(ADDRESS=(PROTOCOL=tcp)(HOST=0.0.0.0)(PORT=1521)))
Connecting to (DESCRIPTION=(ADDRESS=(PROTOCOL=IPC)(KEY=EXTPROC1)))
STATUS of the LISTENER
------------------------
Alias                     LISTENER
Version                   TNSLSNR for Linux: Version 23.0.0.0.0 - Production
Start Date                27-OCT-2023 14:35:15
Uptime                    0 days 0 hr. 0 min. 0 sec
Trace Level               off
Security                  ON: Local OS Authentication
SNMP                      OFF
Listener Parameter File   /u01/app/oracle/product/23.3/dbhome_1/network/admin/listener.ora
Listener Log File         /u01/app/oracle/diag/tnslsnr/5c440ea826ca/listener/alert/log.xml
Listening Endpoints Summary...
  (DESCRIPTION=(ADDRESS=(PROTOCOL=ipc)(KEY=EXTPROC1)))
  (DESCRIPTION=(ADDRESS=(PROTOCOL=tcp)(HOST=0.0.0.0)(PORT=1521)))
Services Summary...
Service "ORCL" has 1 instance(s).
  Instance "ORCL", status UNKNOWN, has 1 handler(s) for this service...
The command completed successfully

# ----------------------------------------------------------------------------------------------- #
  runDBCA: Creating container database ORCL and 1 pluggable database(s) with name ORCLPDB1 at 2023-10-27 14:35:15
# ----------------------------------------------------------------------------------------------- #
Prepare for db operation
8% complete
Copying database files
31% complete
Creating and starting Oracle instance
...
Executing Post Configuration Actions
100% complete
Database creation complete. For details check the logfiles at:
 /u01/app/oracle/cfgtoollogs/dbca/ORCL.
Database Information:
Global Database Name:ORCL
System Identifier(SID):ORCL
Look at the log file "/u01/app/oracle/cfgtoollogs/dbca/ORCL/ORCL.log" for further details.

Pluggable database altered.
Pluggable database altered.
It's complete when you see the "DBCA complete" and "Database is open and available" messages:
# ----------------------------------------------------------------------------------------------- #
  runDBCA: DBCA complete at 2023-10-27 14:42:30
# ----------------------------------------------------------------------------------------------- #

# ----------------------------------------------------------------------------------------------- #
  Database ORCL with unique name ORCL is open and available.
# ----------------------------------------------------------------------------------------------- #
Connect to the container:
docker exec -it $CONTAINER_NAME bash
To clean up, stop the container and remove the volumes:
docker rm -f $CONTAINER_NAME
rm -fr $ORADATA/$CONTAINER_NAME
 for dir in audit data diag
  do docker volume rm $ 2>/dev/null
done